 |
| he's in the zone too. |
Lately he's been playing Skyrim, which is actually a pretty awesome game. I have been watching him play, and I finally gave in and started playing briefly the other night (mostly just created my character), and I'm so proud of her, because she looks like a total bad-ass. I tried to get a screenshot of my character to put on here and show you but for some reason it won't work! Oh well.
Anywho, back to crafts...
I went PAINT CRAZY yesterday.
Shane's mom had given me a bunch of these small 5'' x 7'' canvases to work with, so I put them to good use and made this cuteness:
 |
| this one reminds me of autumn trees. :) |
 |
| fiestaaaa! |
 |
| for this one, i did the rubber band/spray paint trick, and hand painted yellow zig-zags where the rubber bands were. |
 |
| polka dots! |
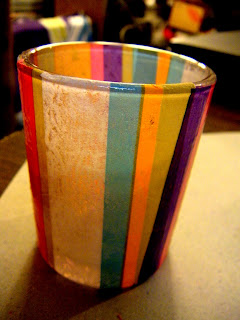
With one of my glass votives, I decided to do something different. I have been wanting to use my Mod Podge lately, and I saved a bunch of tissue paper from my birthday gifts this year, so I figured, why not decoupage a votive?
Here's what I used:
 |
| tissue paper, foam brush, plastic cup, scissors, votive, mod podge, spray adhesive. |
Now, if it were a solid color tissue paper, I would have just cut one long strip and wrapped it around, but since these votives are just the slightest bit tapered the stripes got all wonky and it was way more frustrating to do it that way. This was much easier. Always be aware of your patterns and how they will fit together when doing something like this.
After getting my strips of tissue paper ready, I sprayed my adhesive right on the glass and placed my strips on it.
I let the adhesive bind to the tissue and dry on the glass, which only took a few minutes.
After it dried, I used the foam brush to put two coats of Mod Podge on over the tissue paper. (Let each coat dry for at least 20-30 mins.
Once the Mod podge dried, I had a pretty cute new votive to show off!
Another project I had tonight was another Sharpie Tie-dye shirt. (Sharpie Tie-Dye tutorial). My niece Mackenzie told me that she specifically wanted me to make her a T-shirt, and that she wanted it to include a peace sign. I went ahead and used my pink Sharpies for the tie-dye, let it dry, then cut out a peace sign stencil out of thick cardstock, taped it to the shirt, spray painted it purple, and voila!
 |
| stencil on... |
 |
| stencil off! |
I took a different approach from the tie-dye when making a t-shirt for Mackenzie's sister and my other niece, Haley.
Here's what I used:
 |
| clean, white t-shirt, spray paints, duct tape, scissors. |
Once you have the design taped off, grab your spray paints and make sure you're in a well-ventilated area or outside. Spray paint the shirt however you like! This is how mine turned out:
 |
| he's convinced himself he's keeping this one. |
While I wait for things to dry, I like to keep busy with other projects. Once I get going it's pretty hard to stop me. I know you guys are probably getting sick of these, but I made a few more Elmer's glue design canvases. Sorry for the poor picture quality, but here's what I made:
Coming soon: Creative Coasters, a re-vamped shoe-rack, Christmas ornaments, and homemade lamps!
(P.S. I am very appreciative of everyone who has been checking out this blog, I've had over 10,000 views already, and I've only been actively posting since late October!


i am jealous of all your craft making. :)
ReplyDeletenext time i visit for an extended period of time i'll bring my supplies and we'll have a craft-a-thon together! :)
ReplyDeleteI love the elmers glue canvases! did you just make your design in glue and then paint over it with a brush?
ReplyDeleteyep! made the design in glue, let it dry overnight, then painted over it with acrylic paint! you can see in my past posts i've made others too, it's one of my favorite crafts lately. :)
ReplyDelete