Showing posts with label canvases. Show all posts

12.08.2011

DIY craft overload!

Yesterday, I was in the zone. I stayed up until 3AM, in the garage, crafting. How do I get away with this while living with my boyfriend, you ask? Well, he gets to play video games while I craft, so he welcomes craft time with open arms. 

he's in the zone too.

Lately he's been playing Skyrim, which is actually a pretty awesome game. I have been watching him play, and I finally gave in and started playing briefly the other night (mostly just created my character), and I'm so proud of her, because she looks like a total bad-ass. I tried to get a screenshot of my character to put on here and show you but for some reason it won't work! Oh well. 


Anywho, back to crafts... 
I went PAINT CRAZY yesterday. 


Shane's mom had given me a bunch of these small 5'' x 7'' canvases to work with, so I put them to good use and made this cuteness:

I also painted these adorable little glass votives that I bought for $1/each at Wal-Mart. I just used acrylic paint, a steady hand and a tiny paint brush. 

this one reminds me of autumn trees. :)

fiestaaaa!

for this one, i did the rubber band/spray paint trick, and
hand painted yellow zig-zags where the rubber bands were.

polka dots!


While I'm still talking about these glass votives, I've got a tutorial for you! 


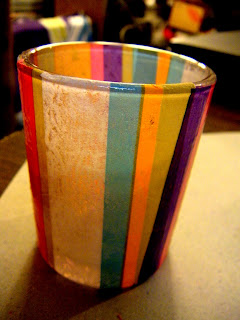
With one of my glass votives, I decided to do something different. I have been wanting to use my Mod Podge lately, and I saved a bunch of tissue paper from my birthday gifts this year, so I figured, why not decoupage a votive? 


Here's what I used: 
tissue paper, foam brush, plastic cup, scissors, votive,
mod podge, spray adhesive.
First, I measured the height of the votive and cut about 3 strips of tissue paper, the length of which match the height of the votive. 
Now, if it were a solid color tissue paper, I would have just cut one long strip and wrapped it around, but since these votives are just the slightest bit tapered the stripes got all wonky and it was way more frustrating to do it that way. This was much easier. Always be aware of your patterns and how they will fit together when doing something like this. 


After getting my strips of tissue paper ready, I sprayed my adhesive right on the glass and placed my strips on it. 
I let the adhesive bind to the tissue and dry on the glass, which only took a few minutes.
After it dried, I used the foam brush to put two coats of Mod Podge on over the tissue paper. (Let each coat dry for at least 20-30 mins.


Once the Mod podge dried, I had a pretty cute new votive to show off! 


Another project I had tonight was another Sharpie Tie-dye shirt. (Sharpie Tie-Dye tutorial). My niece Mackenzie told me that she specifically wanted me to make her a T-shirt, and that she wanted it to include a peace sign. I went ahead and used my pink Sharpies for the tie-dye, let it dry, then cut out a peace sign stencil out of thick cardstock, taped it to the shirt, spray painted it purple, and voila! 
stencil on...

stencil off! 
And while I'm on the subject of spray painting T-shirts, here's a quick DIY T-shirt tutorial...


I took a different approach from the tie-dye when making a t-shirt for Mackenzie's sister and my other niece, Haley. 


Here's what I used: 
clean, white t-shirt, spray paints, duct tape, scissors.
Pin the t-shirt or tape it to a piece of cardboard, and tape off your design. All I did was cut the strips of duct tape into different widths and placed them randomly on the shirt. 


Once you have the design taped off, grab your spray paints and make sure you're in a well-ventilated area or outside. Spray paint the shirt however you like! This is how mine turned out: 

he's convinced himself he's keeping this one.
Pretty damn easy, and the possibilities for this are limitless!


While I wait for things to dry, I like to keep busy with other projects. Once I get going it's pretty hard to stop me. I know you guys are probably getting sick of these, but I made a few more Elmer's glue design canvases. Sorry for the poor picture quality, but here's what I made: 


Coming soon: Creative Coasters, a re-vamped shoe-rack, Christmas ornaments, and homemade lamps!


(P.S. I am very appreciative of everyone who has been checking out this blog, I've had over 10,000 views already, and I've only been actively posting since late October! 
Feel free to comment on my posts to give me feedback, or if you prefer one-on-one communication, you can email comments and craft suggestions to Quirkability@Gmail.com.)                                                                                                                                                                                                                                                                                                                                                                                                                                                                                                                                                                                                                                                                                                                                                                                                                                                                                                                                                                                                                                                                                                                                                                                                                                                                                                                                                                                                                                                                                                                                        

12.04.2011

Playing with Neon Crayons & Sharpies.

Last night while Shane was working, I decided to try something I had seen on Pinterest, which was crayon shaving art. I went out and got the necessary supplies (all I really needed to buy were the crayons and the wax paper.) 

Neon Crayons, tape, wax paper, canvas, sharpener, paper towels.
(i wound up using scissors to whittle the shavings off, it was far easier.)
I started by laying my canvas on paper towels so the crayon shavings wouldn't get too out of control. From there, I started shaving off bits of crayon. The easiest way i found to do it was to use one blade of the scissors and run it down the edge of the crayon in short little bursts to get little curly shavings. When I used the sharpener, I got wider, bigger pieces which I didn't like. But if that's what you're looking for, give that a shot. 


I pretty much left the shavings however they fell onto the canvas, and didn't try to re-arrange them in any way. I'm doing this project again tonight and i'm going to make the shavings into flowers and do a line of green shavings for the stem. I'll post pictures for you of course. :)
Anywho, after the shavings were done, I covered the canvas in a sheet of wax paper, waxy side down, and taped it to the underside of the canvas with my scotch tape. 


Then, I applied heat using my hairdryer on the lowest setting. I held it really close to the wax paper.


While you're applying heat, you can see the crayons melt and the colors running into each other. 


After stripping the wax paper off, this is what it looks like: 

I'm trying to decide whether I want to leave it as-is, add photo corners and use it as a picture frame, or add black vinyl lettering. Decisions, Decisions. Any opinions? 


After the crayons, I moved on to my other project. Really quick, simple tie-dying with instant results. 
I found this idea on Pinterest as well, and this was my practice shirt. 


Here's what I used: 
Shirt, Sharpies, Eyedropper, Rubber Bands, Rubbing Alcohol, Plastic Cup.
I also used a piece of cardboard to put inside the shirt so the color
didn't bleed through to the back while drying. 
First, choose where on the T-shirt you would like to tie-dye. If you plan on doing the entire shirt, those Sharpies better be fresh! And, a great tip and reminder that I got from the pinterest post... 
DO NOT use complimentary colors in your design, they will turn brown when they run together. 
(ex: don't use Red & Green.)

I decided on a variation of pinks and purples, and a little bit of orange. 
I gathered the section I wanted to tie-dye, put it over the top of the cup, rubber banded it to the cup, and it looked like this: 


After my fabric section was chosen, I colored it with Sharpies.


Note: Before I continue, I want to remind everyone to do this in a well-ventilated area. Alcohol fumes are not good for you! 


After prepping that section, I used my eyedropper and dripped alcohol into the section over the cup, causing the colors to bleed and spread rapidly. I didn't get a great picture of that part, since my fabric was smooshed into my cup. 


Here's what it looks like afterward, though. 

I repeated the process for the two other rosettes on the shirt, as you can see, and also the single rosette on the other side of the neck. 


I let it dry overnight, and I'm going to pop it in the dryer for a bit today to set the colors even more. 
What do you think? 


In other news, I received some cute little trinkets that I ordered on Etsy. I saw a post on Reddit from a user whose girlfriend had an Etsy Shop. I decided to look and see what type of things she had made, and fell in love with a Reddit Zombie bottle cap pendant. 
I ordered that (and one other thing, which is part of a Christmas present for a friend, so I can't show it yet, although it is equally as cute!) and the following week I received it in the mail. I am satisfied, it is exactly how I expected it to look, and it even came with a chain, although I'll be altering that. The only downside from ordering from this seller was that she didn't pay the correct postage and when it showed up at our doorstep, we had to pay $0.83 to accept it. Not a huge deal, but still kind of an unexpected inconvenience, especially when I already paid her for the shipping. 
Here's the pendant:

After Shane got home from work last night, we went out for an alcohol run, since there was none left in the house and it's nice to come home sometimes from work and have a beer or three. 
We got some Miller High Life, Mike's, and Shane found these little 7 oz. Colt 45 Blast drinks. 


We got Raspberry-Watermelon. The alcohol content is 12% alc./vol. That is Four Loko territory!! I was expecting it to taste just as badly as Four Loko did, but surprisingly, it tasted delicious. Not too much alcohol taste, doesn't burn your throat when you drink it. It tastes like pretty much any other malt liquor drink, which is probably dangerous, because a few of these babies will knock you on your ass for sure. I only had one and about 2/3 of the way through it, I was feeling a decent buzz... and it typically takes a FEW drinks to do that to me.
I give it a thumbs up. 


I'm doing more crafting this evening, so I shall have more tutorials for you soon!