Pages

12.29.2011

I heart Sephora! (...and my boyfriend too)

I am a lucky, lucky girl. I quite possibly have the most wonderful boyfriend in the universe. For example, he brought me breakfast in bed this morning for absolutely no reason whatsoever. I know, UR JELLY.  :P


Anywho, I received my Christmas gift from Shane in the mail yesterday, and I couldn't be happier! For a makeup-loving girl like myself, this was perfect! 
The goodies I received are from the bareMinerals "Putting on the Glitz" collection. 


Here's what it looks like:


closeup of the box


my spread. fantastic.


The collection includes:


- 0.13 oz Pretty Amazing Lipgloss in Perky (warm rose)
- 0.1 oz Prime Time Primer Shadow in Toasted Almond (iced coffee)
- 0.02 oz Eyecolor in Glamtastic (warm champagne luster) 
- 0.02 oz Eyecolor in Glitz (smoky plum sparkle)
- 0.044 oz Round The Clock Waterproof Eyeliner in 5 pm (deep plum)
- 0.33 oz Flawless Definition Volumizing Mascara in Black
- 0.03 oz Blush in Gorgeous (petunia pink)
- 0.03 oz All-Over Face Color in Luxe Radiance (apricot pink)
- Double-Ended Luxe Cheek & Eye Brush 
- Sparkling clutch 

(Description taken from www.Sephora.com

For my free samples,  I chose bareMinerals Purifying Facial Cleanser for combination skin: 


Viva la Juicy Perfume: 


Korres Antiageing Primer: 


And, Gucci Guilty Intense perfume: 


I love them all, and I cannot wait to try them out! I will do a review as soon as I get a chance! :)

Doodle time!

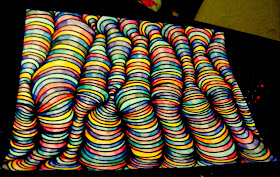
I've been making tons of these doodle drawings lately. I got the idea from a random blog of a 4th grade art teacher. If a 4th grader can do it, so can you! :)


Here's what you'll need: 
black Sharpie, colored pencils, paper, sharpener.

Start by drawing a wavy line across the paper like this. Don't make your hills too big.


Make 8 dots along the line. They don't need to be spaced evenly, do it however you like. 


From there, start to connect the dots. Don't worry about it being perfect. You can also camp out in certain areas to make them bigger or avoid them to make them smaller, which gives it more of an optical illusion type of effect. 

here you can see what the beginning of the design
should look similar to.
After you fill up the entire page, it should look a little something like this: 


Now you can start coloring the sections in. Pick colors that go well together. I chose different shades of browns, reds, and greens for this one, since it was a special request. 


When you color in the sections, to give it a more 3D effect, you want to press harder with the pencil in the corners and lighten it as you get towards the middle. 


 Once you're finished coloring it in, it should look just as awesome as this! 


Have fun! :)

12.28.2011

Pauuuuuuse!

I've been feeling pretty icky since yesterday, and haven't been in much of a crafting mood. I'm pretty sure I'm coming down with a cold. Yuck. So, I'm taking a brief hiatus from crafting until next week... I just don't have the energy or creativity for it at the moment. (Plus, our internet has been SUPER crappy for the last few days, so it's kind of a pain in the ass to blog, too.) 
In the meantime, I've started writing. I used to love writing when I was in school, and was very good at it, but my skill and passion for it faded away. To ease myself back into it, I found an empty notebook and a pen and started jotting things down.


Yesterday, I made a list of some things that inspire me:


-George Lass and her constant smirk. (Dead Like Me)


-Winter sunset...pink & purple pastel sky.


-Beautiful, intricate Indian clothing/style.


-Close-ups of EYEBALLZZZZ. (have you ever studied one very closely?)


-Hot breath on cold air.

mmm, Chanel.
-Sheer, shimmery fabrics


-Halloween decorations


-Tiny trinket boxes (or anything "mini" for that matter...)


-Paint splatter


-Lace


-Ads from the 50's (Leave it to Beaver style).


This is a never-ending list, I keep adding onto it as I realize more and more things that pique my attention.


What inspires you?

12.26.2011

Crafty Career?

Michael's, a popular arts & crafts store, called me today to set up an interview for a possible job there. I have an interview later this week! I am so excited, and I really hope they have an employee discount!
I will update everyone on how it goes... I tend to do pretty well with interviews, so I'm not too worried about it. Wish me luck!! :)

12.21.2011

A quick post before we hit the road...

Shane and I are going to leave for Cedar Rapids in a couple hours, so I thought I'd take this little bit of downtime I have to share with you some of the things I worked on this week. 


First, I finished up a couple Christmas presents... 


For Madyson (14 yrs old), I bought a little wooden drawer thingy at Michael's. Her room is painted hot pink and neon green, so those are the colors I painted it. Around the polka dots and on the neon green knobs, I painted on some glow-in-the-dark paint. :) 
(oh, and sorry about the color variation in the pictures, I used two different settings on my camera when taking these. but the true colors are the bottom picture with the flash.)


For Jake, a very adventurous kid who loves playing with Lego's and creating his own little worlds, I bought a wooden castle thing from Michael's and painted it. I love the treasure chest and the skeleton bones on the back. :) 


gold dubloons!

I also made a T-shirt for Jake. My friend Cathy and I tried this technique last summer on a few black t shirts and tank tops. 


Here is a quickie tutorial for you: 


Materials: 
T-Shirt (dark colored)
Bleach-water (you can dilute it however you like, the best solution I've found is about 70% bleach 30% water. This time, however, I used a much more diluted mixture that wasn't nearly as potent.)
duct tape
spray bottle
cardboard
A WELL-VENTILATED AREA


Start with a dark-colored shirt, preferably black or navy blue. 
I bought this navy blue shirt from Target. 
Tape off whatever design you like on the front and/or back with duct tape. 


After taping it off, you will want to tape something like cardboard to the hanger the shirt is on so the bleach won't seep through to the other side.


Spray your t-shirt (in a well-ventilated area!) with the bleach-water, and see the colors change right before your eyes! 
(using some pics from last summer, since I forgot to take a few this time!)


Cathy spraying her tank top.

after being sprayed. you can see the result of my t-shirt
after the duct tape was removed! 
And the result of Jake's T-shirt from today: 


went from navy blue to gray!


Shane's mom has also been making Christmas ornaments, and of course I had to help glitterize them! ;) 


sparklyyyyy.
To make these ornaments, blow up a balloon slightly to a small round shape. (don't use helium quality balloons. you want them to be nice and round.) 
Take cotton string (looks similar to hemp) and cover it in either Elmer's Glue, Mod Podge, or starch. This one, I believe, was done with Elmer's. Wrap the string repetitively around the balloon,to your liking. tuck the end of your string into the top at a secure enough spot and let it dry.
When it is finished drying, pop the balloon, and take care of any leftover glue that may have stuck onto the string. 
Once it looks clean, use spray adhesive (or mod podge could work too) and cover the string in it. 
Then, glitter it up!! Let it hang to dry overnight. 


Enjoy, and have a Merry Christmas, crafters!! 
<3 Meagan.

12.18.2011

Christmas Ornaments!

Update: I know I posted the other day about my grandpa and his failing health, well, this morning Charles Kenneth Lane passed away peacefully in his sleep. He will be missed terribly by his friends and family. R.I.P Grandpa Lane. 
It has been such a sad day, and Shane went to work this morning so I haven't really had anyone to talk to. So, instead of lying in bed and grieving all day, I decided to do some creating to get my mind off things. 


Today, I made Christmas ornaments. This is a great project for kids and adults alike, and very inexpensive!


I started off using these materials: 

paper towel roll, elmer's glue (i eventually switched to my hot glue gun)
glitter, a pen, scissors, ruler, clothespins, Mod Podge

First, cut the paper towel roll into quarter-inch strips. 


Once it is cut up, glue the strips together forming a star. Now, I tried each ornament out a different way. First, I just used Elmer's Glue... if you're using Elmer's glue, make sure that you use the clothespins to hold the pieces together in the star shape until it dries. (I also did a few with my hot glue gun, and that worked MUCH MUCH BETTER and I didn't have to bother with the clothespins. BUT if you don't have a hot glue gun, Elmer's is fine. 


After the glue has dried, remove the clothespins.


Then, spread Mod Podge all over the inside and outside of the star.
Once it's covered in Mod Podge, cover it in glitter. 


After glitterizing it, set it somewhere to dry. (should take anywhere from 20-45 mins depending on how thick you put the Mod Podge on.) 

DRY, you bastards, DRY!

After it is dry, add a piece of string or an ornament hook and you've got yourself a pretty, sparkly new ornament!


Have fun! 

12.17.2011

Ramblings

Hello everyone! This week has been fairly hectic, and we've got an even busier week ahead of us! So, sorry ahead of time for the lack of posts. As you know, I have been working on Christmas presents all week, so I haven't had much time to do crafts. I still have more presents to put together too, it seems like it never ends! I'm just thankful that I'll get to see my friends and family for Christmas. 


Speaking of family, my grandpa's health has unfortunately taken a turn for the worse recently, and he isn't likely to be with us much longer. He's in my thoughts every day. I'll always remember climbing on top of his big tall bed as a kid and watching him play his mandolin. Grandpa, I hope you leave this world painlessly, with all of your memories. 


grandma & grandpa lane (and my cousin brandon)


In other news, Shane got a call about a new job at a warehouse, so he is starting right away on Monday and he'll be working 2nd shift on weekdays and working at the restaurant on the weekends, I feel like I'm never going to see him anymore! :( But, he is going to be making more money, so I suppose that's a plus. 
As for me, I'm working on getting some projects done in the next few weeks so that I can start up an Etsy store, and start making some money off of my jewelry/home deco items that I've made. I probably won't be doing tutorials on the things I am selling unless there is a request. I will post the Etsy store information once I'm finished with it. Stay tuned!


Good evening.

(P.S.: go to Google.com and type in "let it snow". Be amazed.)


12.16.2011

Woo hoo! Christmas is coming!

Well, I have finally cleared our local Home Depot out of their 16 cent off-white ceramic tiles. Shane ran in to pick some up for me the other day and came out with a box full and said "This is all they have left..." Looks like it's time to re-stock, Home Depot!! 


I have been sequestering myself in my workspace all week working my butt off making Christmas presents. I have most of them finished and wrapped, so I'm giving myself a break today. 


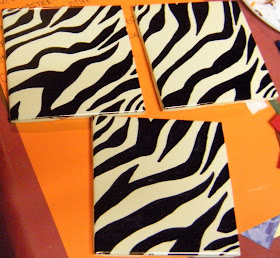
Also, since my little sister specially requested these, down to the colors, I suppose I can show the coasters I made today... zebra print with pink letters: 


i drew in the black lines with sharpie first, then painted over it.
that made things much, much easier.


Also, I made a set of coasters for my mom to match the colors in her living room: 


Aaaaand a peek at one of the song lyric coasters... 


I'm going to try and work on some Christmas ornaments tonight, so hopefully I'll have a tutorial for you tomorrow as long as nothing else gets in the way! 

Oh, also, Jen at 586 Square Feet sent me this awesome Leslie Hall video that I hadn't seen yet. It cracked me up so I'm sharing it with you! 

 
Have a great weekend!