
I cannot stress this enough: MAKE SURE TO DO THIS PROJECT IN A WELL-VENTILATED AREA! YOU WILL BE RELEASING FUMES INTO THE AIR AND THEY CAN BE HARMFUL TO HUMANS AND ANIMALS IF INHALED OR INGESTED. DO NOT USE ISOPROPYL ALCOHOL OR RESIN NEAR AN OPEN FLAME AND PLEASE WEAR A FACE MASK WHEN WORKING WITH RESIN TO AVOID INHALING THE FUMES. YOU SHOULD ALSO WEAR PROTECTIVE LATEX OR NITRILE GLOVES TO PROTECT YOUR SKIN AND GOGGLES TO PROTECT YOUR EYES. PRACTICE PROPER SAFETY!!!
Now that I'm done lecturing you on safety, let's get on with the fun part....
DIY Alcohol Ink Coasters
(sealed with resin)
What you will need for part 1:
 |
| Isopropyl Alcohol, 1 clean paintbrush, 4 white square ceramic floor tiles, alcohol inks in various colors, felt blending pads |
[[I purchased my Alcohol from Walgreens, I found it there for under $4 (for a 32 oz. bottle). I purchased my Tim Holtz Alcohol Inks from 2 different Etsy shops, beadsjustforyoutoo & remembering tuesday. For the 8 bottles that I bought, the total cost was about $23. That sounds like a lot, but these alcohol inks last FOREVER and can be used for practically any smooth surface. They also come in packs of 3 complimentary colors, or you can buy them individually. I also purchased my felt applicators from a shop on Etsy, allforhimart. I bought the coasters at Home Depot, and spent about $5 for 32 tiles...I believe they were about 12 cents per tile.]]
Alrighty! To begin, lay a couple paper towels down (so as not to get ink on your table) and set your first coaster on it. pour a small amount of alcohol into an upturned lid (as pictured) and use your clean paintbrush to paint a layer of alcohol over the ENTIRE tile.

Pick out the colors you'd like to use. I chose Shell Pink, Red Pepper, and Wild Plum.

Pick the color you'd like to use first, and drop a few dots randomly on the tile. You can do as many or as little as you want, get as creative as you want!

Watch as the colors begin to bleed out across the layer of alcohol. You can blow through a straw directed at the ink to help it spread, but don't blow too much, because you may dry out the alcohol.

Next, I added some of the Red Pepper color, and let that start spreading out towards the Wild Plum.

Finally, I add in my Shell Pink and let it bleed out towards the red and the plum.

 |
| Covered with colors, ready for dabbing! |
 |
| Used the felt on about 1/4 of the coaster at this point, wanted to show how different it looks after using the felt applicator. |
 |
| I love when these little circles pop up from the alcohol. Gives it a stone-y effect. |
 |
| Completed color. |
I did the other three tiles in different colors, so I wanted to show the color combinations I used for those as well....
For this coaster, I used colors Meadow, Stream, and Currant.


Here are the four coasters in this set:

All four of these coasters were produced using the same technique.
Set these coasters aside to dry in a relatively dust-free area for a few hours.
Now you're ready for PART TWO!
DIY Resin Coating
What you will need:
 |
| 4 dry coasters, one straw, wooden stirring sticks, small plastic disposable measuring cups (2 per coaster) , wax paper, and resin |
And I will state again, ONLY use resin in a warm, well-ventilated, dust-free area, and practice safety! DO NOT INHALE resin fumes, and wear a face mask and gloves at all times when using resin.
It is also a good idea to turn off all fans in the area so that dust is not travelling in the air. THIS WILL effect your resin.
On to the tutorial!
Start out by placing wax paper on the your work surface and placing one resin coaster on top of a bottle cap or something similar that is smaller than the coaster to keep it from sitting directly on the wax paper. This is so the resin will drip off the sides and onto the wax paper for easy cleanup later.
You will want your coaster to be at least 1/4 " above the surface of the table.

Make sure that the surface of the coaster itself is free of dust/pet hair, etc before coating it.

Pull out your bottles of resin (I use a two-part mix of resin and hardener) and your plastic disposable measuring cups.


Pour your hardener directly into the cup with the resin, until it is at the 2 Tbsp mark. This is an even 1:1 Resin-Hardener mix. Make sure you follow the directions on your particular resin regarding the measurements, some may differ. For the most part, though, It will be an even mix of resin to hardener.

Now, take your wooden stir stick and begin stirring for ONE minute. You will want to make sure to stir well during that minute, as if you were stirring ingredients for baking. Scrape the sides of the cup to get all of the resin incorporated. You will want to time yourself so that you can be accurate on the time for stirring.
Once your timer hits 1 minute, IMMEDIATELY pour your resin into a second measuring cup, making sure to use your stir stick to scrape the edges and get ALL of it into the second cup. This is the 2-cup technique listed in the instructions on my resin and has not failed me ONCE!

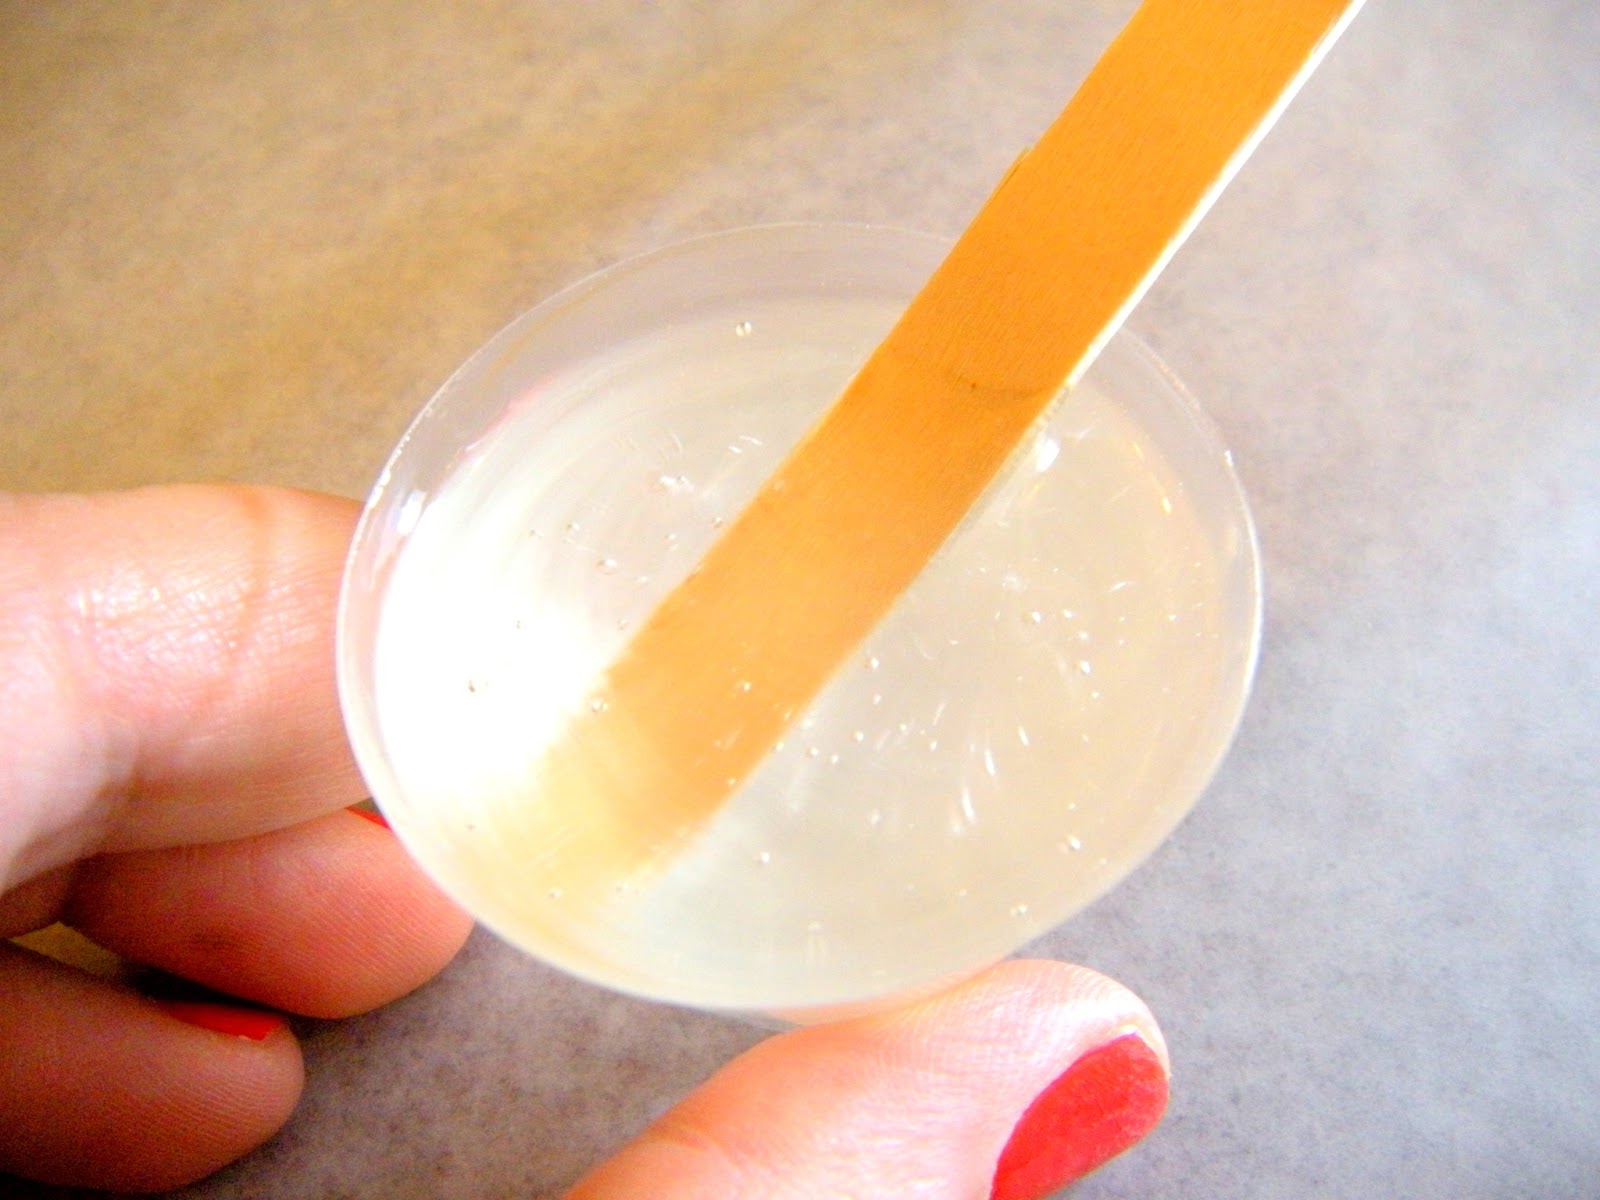
Once you've got it all into the second cup, set your timer for ONE minute again, and stir continuously for that one minute, same as before.
When your timer is up, your resin should be full of bubbles and look just like this:

IMMEDIATELY pour the resin directly onto the center of the coaster (it will begin spreading out towards the edges on it's own) and you can also pour close to the edges to help it along.


You can see the resin beginning to drip off the edges of the coaster onto the wax paper. This is completely normal, just let it do it's thing for about 30 seconds. Feel free to tilt the coaster this way and that (while wearing gloves, of course) to make sure the entire coaster is covered.

Once the resin is covering the entire coaster, gently blow through a straw over the surface of the coasters to pop all of the tiny bubbles on the surface of the resin. Bubbles are completely normal, and if you have them, you are doing it right! Make sure to be thorough, though, and get them all popped. breathing through the straw over the entire coaster 2-3 times should be enough.
AGAIN, MAKE SURE YOU DO NOT INHALE THROUGH THE STRAW WHILE YOU ARE DOING THIS. INHALE AS FAR AWAY AS THE RESIN AS POSSIBLE.

Once all the bubbles are out, it should look smooth and glossy, like this....

Now, use your wooden stir stick CAREFULLY by sliding it along the outer edges of the coaster to remove any built up drips of resin. I also run the stir stick just underneath the edge as well, to make sure it didn't drip onto the underside of the coaster. Some of them may do this anyway, and it's totally fine. Just use some sandpaper when it's finished curing on the drips that formed on the underside and it's not a problem.

Now, WHILE WEARING GLOVES, put down another sheet of wax paper, and with one hand, carefully lift the coaster and the cap underneath and transfer it to the clean sheet. Immediately cover it with a plastic lid or tupperware container of some sort that is free from dust particles, hair, etc. while it is curing.
And we wait. Follow the curing times on your specific resin. Mine are usually finished curing after about 24 hours. Avoid the impulse to lift the lids to check on these in the first 5-7 hours, you don't want an errant piece of hair or dust to fly in and ruin your coasters!
Here is what my set looks like after curing:


If you aren't in the mood to make your own coasters, check back at my store in the next 2 weeks, as I will be adding alcohol ink coaster sets to my shop for you to purchase!
It is truly a nice and useful piece of information. I am satisfied that you shared this useful information with us. Please keep us informed like this. Thank you for sharing.
ReplyDeleteCheapest ink
Wow! These are gorgeous -- and I definitely don't want to make my own. :)
ReplyDeleteFor measuring cups, I found little plastic cups at Walmart. They don't have gradient marks, but I pour the right amount of water in and mark the fill line. The cups come 50 for under $2. I also use my embossing heat tool to blow hot air over the curing resin, to remove the bubbles. The heat will pull bubbles that are below the surface, but if you try this be sure to hold the heat tool high enough to keep the force of the air from splattering your resin! You can use the heat tool every hour or so if bubbles continue to pop up...
ReplyDeleteYes, unfortunately those will not work for me, as I am constantly doing different measurements of resin for different projects, plus you have to be very precise with the measurements, so having the measurements already on there is very handy, and I'm not willing to give that up! haha.
DeleteAs for the heat tool, I had heard that before, but have been a bit too scared to try it. I don't think it's worth the risk of ruining it, when the straw technique works just fine. Plus it just isn't cost effective for me. Thank you for sharing, though! I appreciate your input.
If you dab the sides with the ink they look finished and professional.
ReplyDeleteThis is fascinating! I am glad I found you!
ReplyDeleteThis is awesome. Thanks so much for sharing. Do you need to seal the tiles with a fixative first before you pour on the resin?
ReplyDeleteNope! I've actually tried sealing with Mod Podge and found that it makes the ink run, as well as clear enamel spray. Just make sure that you let the design dry on your tile for about an hour, just to be on the safe side. It will probably be dry long before then, but I like to play it safe. As long as the ink is dry, the resin will not make it run. Hope that helps! :)
DeleteLOVE, love, love this info. I've been searching for days on how to finish off my tiles! So thank you, and does the resin make the tiles heat/cold/water safe for coasters? Again, thanks!
ReplyDeleteI'm not sure whether the resin will make it heat safe, but you can definitely get water on the resin after its fully cured and it'll be fine. in fact, to clean them you'll use a damp washcloth.
DeleteI'm not sure whether the resin will make it heat safe, but you can definitely get water on the resin after its fully cured and it'll be fine. in fact, to clean them you'll use a damp washcloth.
DeleteThanks so much for the information
DeleteThis is very educational content and written well for a change. It's nice to see that some people still understand how to write a quality post! Alcohol Rehab Toronto
ReplyDeleteMuchas gracias por compartir este maravilloso post , muy completo y creativo, gracias.
ReplyDeleteNice post, I bookmark your blog because I found very good information on your blog
ReplyDeleteBierdeckel bedrucken
small plastic mixing cups, like for jello shots.. GFS
ReplyDeleteYou can also mix in the alcohol inks into the resin - then pour onto the tile and tilt - like fluid acrylic art - you can create some really pretty patterns from doing this.
ReplyDeletebefore pouring resin and after ink is dry, place painter's tape around edges on back. turn back over, right side up and pour the resin. when resin is almost set, remove the tape with the "drippings". this prevents having to sand hardened resin from the bottom.
ReplyDeleteI am doing a class project for my daughters school gala/auction. The kids painted tiles then we adhered them to a tray. My pain was to apply resin over top of all the tiles. I did a practice one and the resin made some of the colors run, which was ok, but the pink color faded. Did I do something wrong??? I read on another site that happened to someone else. But she also stated that somehow some of the color came back. Has anyone else have that happen.
ReplyDeleteIt may depend what type of paint you used, I have only used acrylic paint many times and never had any problems with fading.
DeleteI might be a little late to this post (great information on this btw, really helpful). I just read somewhere else that the ink manufacture has said that some of the pinks will disappear under the resin. No real explanation, it just is what it is.
DeleteThanks for the great instructions. My only question is after we transfer the tile you say to cover it with some kind of lid.. do I place it directly on the tile?
ReplyDeleteThank you!
No, the lid will need to be taller and wider than the tile, you don't want anything touching the tile while it's curing. The lid is just to cover it from dust/hair.
Delete