Showing posts with label projects. Show all posts

12.21.2011

A quick post before we hit the road...

Shane and I are going to leave for Cedar Rapids in a couple hours, so I thought I'd take this little bit of downtime I have to share with you some of the things I worked on this week. 


First, I finished up a couple Christmas presents... 


For Madyson (14 yrs old), I bought a little wooden drawer thingy at Michael's. Her room is painted hot pink and neon green, so those are the colors I painted it. Around the polka dots and on the neon green knobs, I painted on some glow-in-the-dark paint. :) 
(oh, and sorry about the color variation in the pictures, I used two different settings on my camera when taking these. but the true colors are the bottom picture with the flash.)


For Jake, a very adventurous kid who loves playing with Lego's and creating his own little worlds, I bought a wooden castle thing from Michael's and painted it. I love the treasure chest and the skeleton bones on the back. :) 


gold dubloons!

I also made a T-shirt for Jake. My friend Cathy and I tried this technique last summer on a few black t shirts and tank tops. 


Here is a quickie tutorial for you: 


Materials: 
T-Shirt (dark colored)
Bleach-water (you can dilute it however you like, the best solution I've found is about 70% bleach 30% water. This time, however, I used a much more diluted mixture that wasn't nearly as potent.)
duct tape
spray bottle
cardboard
A WELL-VENTILATED AREA


Start with a dark-colored shirt, preferably black or navy blue. 
I bought this navy blue shirt from Target. 
Tape off whatever design you like on the front and/or back with duct tape. 


After taping it off, you will want to tape something like cardboard to the hanger the shirt is on so the bleach won't seep through to the other side.


Spray your t-shirt (in a well-ventilated area!) with the bleach-water, and see the colors change right before your eyes! 
(using some pics from last summer, since I forgot to take a few this time!)


Cathy spraying her tank top.

after being sprayed. you can see the result of my t-shirt
after the duct tape was removed! 
And the result of Jake's T-shirt from today: 


went from navy blue to gray!


Shane's mom has also been making Christmas ornaments, and of course I had to help glitterize them! ;) 


sparklyyyyy.
To make these ornaments, blow up a balloon slightly to a small round shape. (don't use helium quality balloons. you want them to be nice and round.) 
Take cotton string (looks similar to hemp) and cover it in either Elmer's Glue, Mod Podge, or starch. This one, I believe, was done with Elmer's. Wrap the string repetitively around the balloon,to your liking. tuck the end of your string into the top at a secure enough spot and let it dry.
When it is finished drying, pop the balloon, and take care of any leftover glue that may have stuck onto the string. 
Once it looks clean, use spray adhesive (or mod podge could work too) and cover the string in it. 
Then, glitter it up!! Let it hang to dry overnight. 


Enjoy, and have a Merry Christmas, crafters!! 
<3 Meagan.

12.16.2011

Woo hoo! Christmas is coming!

Well, I have finally cleared our local Home Depot out of their 16 cent off-white ceramic tiles. Shane ran in to pick some up for me the other day and came out with a box full and said "This is all they have left..." Looks like it's time to re-stock, Home Depot!! 


I have been sequestering myself in my workspace all week working my butt off making Christmas presents. I have most of them finished and wrapped, so I'm giving myself a break today. 


Also, since my little sister specially requested these, down to the colors, I suppose I can show the coasters I made today... zebra print with pink letters: 


i drew in the black lines with sharpie first, then painted over it.
that made things much, much easier.


Also, I made a set of coasters for my mom to match the colors in her living room: 


Aaaaand a peek at one of the song lyric coasters... 


I'm going to try and work on some Christmas ornaments tonight, so hopefully I'll have a tutorial for you tomorrow as long as nothing else gets in the way! 

Oh, also, Jen at 586 Square Feet sent me this awesome Leslie Hall video that I hadn't seen yet. It cracked me up so I'm sharing it with you! 

 
Have a great weekend! 

12.14.2011

Hand-painted Reddit Coasters!

Hey all! Last night I was cranking out more Christmas presents, but I also whipped up a set of Reddit coasters and a couple cute owl coasters for your viewing pleasure. Here you go! :) 


owl #1

owl #2

Reddit alien

NYAN CAT!

fuck yeah.


I will have more to show you later! 
Coming up: Dr. Who coasters & Christmas Ornaments!

12.13.2011

Christmas Craziness

Sorry about the lack of posts for the last few days. I've been holed up in my little workshop, and I feel like one of Santa's elves. I can't really post a lot of what I'm working on right now since I want my friends and family to be surprised when they open their gifts, but you'll see them after Christmas. 


Also, Shane and I are going to be going to be going back to my hometown again for Christmas so that we can celebrate and exchange gifts and spend time with my family. We're heading out there next Thursday and coming back home on Christmas Eve. I'm just hoping the traffic isn't too ridiculous on Christmas Eve, and that the weather stays as calm as it has been lately. 
It was beautiful outside today!


One thing I CAN post about is the Reddit coasters I'm making tomorrow so stay tuned for those! Also, as soon as we get a chance, Shane's mom is going to teach me how to make Christmas ornaments and we'll have a tutorial for you as well! 


Oh, and a quick story before I completely forget to blog about it... Shane and I were at Wal-Mart the other day and I was cashing my paycheck. We got in line at the customer service counter behind a plump little balding man who was talking very excitedly and waving this DVD in the air: 


 He got my attention, so I started listening to what he was saying and he was ranting and raving about the plot of the movie. Basically, it's a quadruple feature, 4 films in one. Here's what I got off Wikipedia, to save you the expletives and ravings from this weird old man. 


So, as you can imagine, when this man is waving this ridiculous DVD around, yelling about "The Gays"(his words, not mine.), Werewolves, Zombies, and Hitler I'm going to start cracking the fuck up. I lost my shit. I almost got the kid working customer service that had to get yelled at in trouble because he started laughing too. Finally he assured the man he would do something about getting that movie off the Children's dvd shelf. Made my day. 


Oh, and Happy Freakin' BIRTHDAY to my Dad and my friend Cathy today! 


More crafts soon! 
xoxo, Meagan. 


12.09.2011

Coasters, coasters, coasters!

A couple of days ago, my friend Brittany reminded me of these DIY coasters that I have been planning on doing for a little while now. Yesterday I went out to Home Depot and got some small square tiles (they are SUPER cheap, between about 16 - 60 cents each). 

I did 4 different sets. 

The first set I turned into movie quote coasters. All I used was Dimensional Paint (the puffy fabric paint stuff that comes in the little squeeze bottles). I had to let them dry overnight so they're not COMPLETELY finished yet, but all I need to do to finish them is put a layer of spray glaze over them to seal them up, which I'll be doing today.


The second set is R.O.Y.G.B.I.V.-inspired. All I did with these ones was draw on the design with Sharpie and then go over it with Mod Podge to give it a little more dimension and then put a layer of spray glaze over them. (Again, will be finishing that part off today.) 


The third set is my glitter coasters... 
To make the glitter coasters, I used these materials: 

tile, mod podge, glitter, spray glaze.
(also used plastic cup and foam brush for the mod podge!!)
I did the coasters pretty much the same way I did my GLITTER SHOES, by mixing the glitter in with the mod podge, then applying it with a foam brush in thick coats onto the tile. (Let tile dry for about 45 mins. between coats).


this was NOT my final coat, I did one more
VERY thick coat of the mod podge mixture on
top of this.
And again, don't worry about the mod podge being white now, it will dry clear and show off the coaster in all it's glittered glory! 
Here is the finished product, after letting it dry overnight:


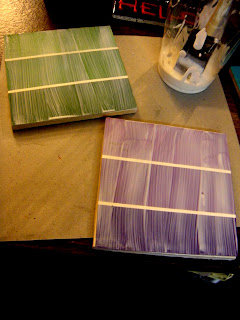
The fourth set I did yesterday was my paint chip coasters! I saw this idea on Pinterest and had to try it out, since I love cheap crafts. I picked up a bunch of different colored Behr paint chips at Home Depot while I was buying my tiles. 


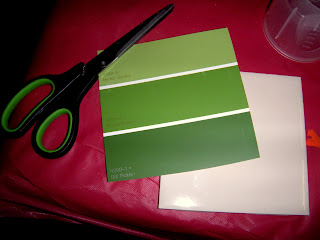
To make the paint chip coasters, I used these materials: 

mod podge, spray adhesive, scissors, tile, paint chips.
you can go with or without the ruler, i went without.

trace or measure out your square on the paint chip. 

cut out the square....

spray adhesive on the back of the paint chip card,
then press firmly onto the tile. make sure it's centered,
and all edges are pressed down. 
after adhesive is dry (just takes a few minutes),
brush about 3 coats of mod podge onto the coasters
and around the edges of the tile, just to seal it up. 

finished set! 
As you know, while I wait for things to dry, I work on other projects. Last night I jazzed up a cute little box I bought for a couple bucks at Michaels. 


There was an inset square on the lid, so I decided to use some more of that striped tissue paper I used on the glass votive in my previous post...here's what I did step-by-step. 

Painted the box with two coats of orange acrylic paint.
Cut out tissue paper to match the measurements of the square on the lid
Sprayed adhesive onto where I wanted the tissue paper
Pressed the tissue paper onto it
Let it dry (give it a few minutes) 
3 coats of Mod Podge to the tissue paper
1 coat of enamel gloss to the orange painted parts


After all that crafting last night, I came out of the garage (my workspace) to find out it had snowed finally! Very lightly, of course, but hey, snow is snow. 


Oh, and I finally got a picture of my Skyrim character. Not the greatest picture quality, but still pretty awesome, no? 


That's all for today, have fun with this cheap craft idea! 

12.08.2011

DIY craft overload!

Yesterday, I was in the zone. I stayed up until 3AM, in the garage, crafting. How do I get away with this while living with my boyfriend, you ask? Well, he gets to play video games while I craft, so he welcomes craft time with open arms. 

he's in the zone too.

Lately he's been playing Skyrim, which is actually a pretty awesome game. I have been watching him play, and I finally gave in and started playing briefly the other night (mostly just created my character), and I'm so proud of her, because she looks like a total bad-ass. I tried to get a screenshot of my character to put on here and show you but for some reason it won't work! Oh well. 


Anywho, back to crafts... 
I went PAINT CRAZY yesterday. 


Shane's mom had given me a bunch of these small 5'' x 7'' canvases to work with, so I put them to good use and made this cuteness:

I also painted these adorable little glass votives that I bought for $1/each at Wal-Mart. I just used acrylic paint, a steady hand and a tiny paint brush. 

this one reminds me of autumn trees. :)

fiestaaaa!

for this one, i did the rubber band/spray paint trick, and
hand painted yellow zig-zags where the rubber bands were.

polka dots!


While I'm still talking about these glass votives, I've got a tutorial for you! 


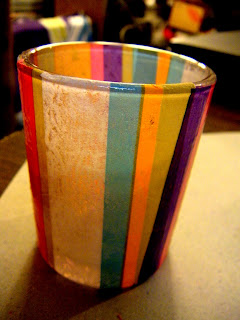
With one of my glass votives, I decided to do something different. I have been wanting to use my Mod Podge lately, and I saved a bunch of tissue paper from my birthday gifts this year, so I figured, why not decoupage a votive? 


Here's what I used: 
tissue paper, foam brush, plastic cup, scissors, votive,
mod podge, spray adhesive.
First, I measured the height of the votive and cut about 3 strips of tissue paper, the length of which match the height of the votive. 
Now, if it were a solid color tissue paper, I would have just cut one long strip and wrapped it around, but since these votives are just the slightest bit tapered the stripes got all wonky and it was way more frustrating to do it that way. This was much easier. Always be aware of your patterns and how they will fit together when doing something like this. 


After getting my strips of tissue paper ready, I sprayed my adhesive right on the glass and placed my strips on it. 
I let the adhesive bind to the tissue and dry on the glass, which only took a few minutes.
After it dried, I used the foam brush to put two coats of Mod Podge on over the tissue paper. (Let each coat dry for at least 20-30 mins.


Once the Mod podge dried, I had a pretty cute new votive to show off! 


Another project I had tonight was another Sharpie Tie-dye shirt. (Sharpie Tie-Dye tutorial). My niece Mackenzie told me that she specifically wanted me to make her a T-shirt, and that she wanted it to include a peace sign. I went ahead and used my pink Sharpies for the tie-dye, let it dry, then cut out a peace sign stencil out of thick cardstock, taped it to the shirt, spray painted it purple, and voila! 
stencil on...

stencil off! 
And while I'm on the subject of spray painting T-shirts, here's a quick DIY T-shirt tutorial...


I took a different approach from the tie-dye when making a t-shirt for Mackenzie's sister and my other niece, Haley. 


Here's what I used: 
clean, white t-shirt, spray paints, duct tape, scissors.
Pin the t-shirt or tape it to a piece of cardboard, and tape off your design. All I did was cut the strips of duct tape into different widths and placed them randomly on the shirt. 


Once you have the design taped off, grab your spray paints and make sure you're in a well-ventilated area or outside. Spray paint the shirt however you like! This is how mine turned out: 

he's convinced himself he's keeping this one.
Pretty damn easy, and the possibilities for this are limitless!


While I wait for things to dry, I like to keep busy with other projects. Once I get going it's pretty hard to stop me. I know you guys are probably getting sick of these, but I made a few more Elmer's glue design canvases. Sorry for the poor picture quality, but here's what I made: 


Coming soon: Creative Coasters, a re-vamped shoe-rack, Christmas ornaments, and homemade lamps!


(P.S. I am very appreciative of everyone who has been checking out this blog, I've had over 10,000 views already, and I've only been actively posting since late October! 
Feel free to comment on my posts to give me feedback, or if you prefer one-on-one communication, you can email comments and craft suggestions to Quirkability@Gmail.com.)