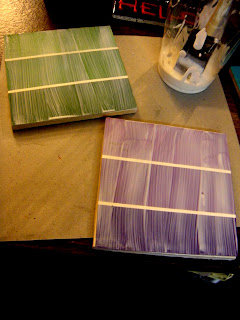
The first set I turned into movie quote coasters. All I used was Dimensional Paint (the puffy fabric paint stuff that comes in the little squeeze bottles). I had to let them dry overnight so they're not COMPLETELY finished yet, but all I need to do to finish them is put a layer of spray glaze over them to seal them up, which I'll be doing today.
The second set is R.O.Y.G.B.I.V.-inspired. All I did with these ones was draw on the design with Sharpie and then go over it with Mod Podge to give it a little more dimension and then put a layer of spray glaze over them. (Again, will be finishing that part off today.)
The third set is my glitter coasters...
To make the glitter coasters, I used these materials:
 |
| tile, mod podge, glitter, spray glaze. (also used plastic cup and foam brush for the mod podge!!) |
I did the coasters pretty much the same way I did my GLITTER SHOES, by mixing the glitter in with the mod podge, then applying it with a foam brush in thick coats onto the tile. (Let tile dry for about 45 mins. between coats).
 |
| this was NOT my final coat, I did one more VERY thick coat of the mod podge mixture on top of this. |
And again, don't worry about the mod podge being white now, it will dry clear and show off the coaster in all it's glittered glory!
Here is the finished product, after letting it dry overnight:
The fourth set I did yesterday was my paint chip coasters! I saw this idea on Pinterest and had to try it out, since I love cheap crafts. I picked up a bunch of different colored Behr paint chips at Home Depot while I was buying my tiles.
To make the paint chip coasters, I used these materials:
 |
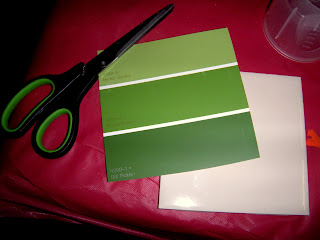
| mod podge, spray adhesive, scissors, tile, paint chips. you can go with or without the ruler, i went without. |
 |
| trace or measure out your square on the paint chip. |
 |
| cut out the square.... |
 |
| spray adhesive on the back of the paint chip card, then press firmly onto the tile. make sure it's centered, and all edges are pressed down. |
 |
| after adhesive is dry (just takes a few minutes), brush about 3 coats of mod podge onto the coasters and around the edges of the tile, just to seal it up. |
 |
| finished set! |
As you know, while I wait for things to dry, I work on other projects. Last night I jazzed up a cute little box I bought for a couple bucks at Michaels.
There was an inset square on the lid, so I decided to use some more of that striped tissue paper I used on the glass votive in my previous post...here's what I did step-by-step.
Painted the box with two coats of orange acrylic paint.
Cut out tissue paper to match the measurements of the square on the lid
Sprayed adhesive onto where I wanted the tissue paper
Pressed the tissue paper onto it
Let it dry (give it a few minutes)
3 coats of Mod Podge to the tissue paper
1 coat of enamel gloss to the orange painted parts
After all that crafting last night, I came out of the garage (my workspace) to find out it had snowed finally! Very lightly, of course, but hey, snow is snow.
Oh, and I finally got a picture of my Skyrim character. Not the greatest picture quality, but still pretty awesome, no?
That's all for today, have fun with this cheap craft idea!


Great idea! The paint chip ones are so chic, and the glitter ones perfect for a young woman or a teen.
ReplyDeleteThank you very much!
ReplyDeleteOMG I LOVE THE GLITTERIZED ONES! What a great idea! The paint chip ones are awesome, too. You can also make these with scrapbook paper (which is primarily what I'll be giving out for Christmas this year...). I just cut the paper to the size of the tile and mod podged it on, and then sprayed it with sealer. They come out pretty nice. Now I want to go be crafty... :)
ReplyDeleteyes i actually did a set tonight with scrapbook paper! you are a mind-reader! :)
ReplyDeleteI love this idea. It's even better when you can find the tiles in the clearance aisle.
ReplyDeletei cant wait to try the coasters with the paint samples on them!!!! brilliant-modern-and i think my bf will approve and think they are not too girly.
ReplyDelete